Friday 7 February 2014

Magazine Ad Creation


This video, created using Photoshop's animation toolbar, shows the development of my magazine ad.

I began by giving the document a black background and inserting the main focus of the ad- the album. I experimented with a couple of different ideas on the journey to making the ad.
Firstly, I experimented with the idea of having a zombie hand holding the album, but I felt that maybe it would make the hand look like a part of the album. I also tested the idea of having faded album covers to make the, album look a bit more mystical, behind the original. I thought it looked good, but I didn't know how to expand on this and make it look more interesting. In the end, I took inspiration from the zombies map Origins, building on the the fact that my products all have something from a zombies map in them. One of the least used maps in my products was Origins, and it was only late into the productions that I began to add Origins at all. I looked at the map, elements of it, what defined it and decided that the very sky on the map stands out as one of the best looking elements in any of the maps in Zombies. 
The storm background is constructed of two elements, the main storm, and the lightning. To create the storm, I started by creating a shape, and using the Render Clouds tool. This generated clouds all across the ad as a background. I then changed the colour to blue and altered the lighting a bit so it looks as it appears early into the creation video. I chose to do this to reflect the storm in Origins, as that has a blue hue. I also added the swirl effect in the filter/distort menu.
After this, I altered the text, but due to the colour I picked, it still didn't stand out much. This would be an issue I would solve later.
I next multiplied the lightning i made. The original lightning bolt was created following a specific set of instructions i found on google. (http://www.photoshopessentials.com/photo-effects/lightning/). I also used the lightning bolt to make the text clearer. I really think the lightning under the text worked quite well, and the lightning overall was one of the stronger elements here.
To finish off, I made the background brighter just to make it look better and look good beside the lightning.

Thursday 30 January 2014

DIGIPAK FRONT 1.0


Digipak draft 1- Front Cover


Before making the digipak, I took one of the panels from the template and removed the writing on it so it was blank. I did this by putting a white background behind the panel to fill in the gap that was made. The green line was left in as a border, as the template says it is a safety line. I made sure it was the right measurement, so this can be used as a template for most of the panels (except for the CD holders as those panels are slightly different.).


Front Cover


I started by finding a picture of a brick wall. This would be the main image on my front cover. I got rid of the blackness (Magic Wand for the black areas and eraser for the rest) and the bars above the wall so I could add the sky which I had planned on my initial hand drawn version.


After Removing the sky, I tweaked the colouring slightly (CTRL and U), adding a slight orange saturation so it would match the lighting of the sky. I also tweaked the lighting to make it brighter (CTRL and L). I then added three blood streaks (Brush tool) forming a pool, preparing it for when I added the ZOMBIES III to the wall,and some faint blood splatters.


Next, I found an orange sky to go above the wall. I altered the lighting to make it darker, and then added it to the picture of the wall. I think I got the lighting between the two images spot on here.


 ------>


After this, I found a meteor and used a combination of the magic wand and the eraser tools to remove the background. I also toned the lighting down so it didn't look too bright and so it looked at home in my apocalyptic sky.


I then added another couple of details- The hand print in the lower right hand corner, and the Group 916 logo, which I will show my method of obtaining later.


The next step was rather time consuming. The way I was able to get a regular I in “zombies”, required careful erasing around a single I in the original Zombies III logo. I had to make sure it looked smooth and not sketchy in places. Once I was able to cut one out, I removed colour and changed the lighting to match the other letters. Before I did this however, I duplicated it three times and made the colour a more crimson shade of red, to match the blood but at the same time stand out.


   FINAL PRODUCT


This draft worked quite well and will probably end up being my front cover, or at least the basis for it.  After asking a few people about whether it looks like an album cover, the responses were all positive and all said it could appear on shelves in a shop.


Thursday 23 January 2014

CD Cover- Hand Drawn


This first CD cover took a couple of ideas. Firstly, The design is that of a "Perk a Cola" from the Zombies mode, having the band name and album name replace the perk name. This intertextuality almost infers that by owning this disc, you are receiving a perk. Furthermore, the center and the hollow areas filled with blue and orange are made to be like zombie eyes. I chose to include both colours as the game includes both, and my video includes the blue. However, I don't particularly like how this design turned out, liking only the perk idea. 

DVD Cover- Hand Drawn


For this first bonus DVD design, I decided I wanted to bring both the Zombies game mode, and my music video together into one design. To begin with, I started by having the album name on the disc (using a modified version of the logo), as well as the title "Murder Bonus Disc", to say what it was exactly. Regarding the aspects of the game world, I decided I would take the sky of Die Rise to surround the text, just for the sake of appearance as I think it is both effective at looking good, and it also conveys the destruction reflected in the Zombies game mode. Also, I took the Tranzit Bus and the Mark IV Tank from Origins, placing them either side of the disc acting as a timeline ( Tranzit being the first map, Origins being the last). The zombies on the disc I was thinking could be the extras from the video, therefore creating the game/video merge using assets from Zombies, and live action zombies.


Wednesday 22 January 2014

Existing Album Art in My Genre- Avenged


This is a look at existing album covers from within the industry, specifically the album covers of Avenged Sevenfold. Note, these are not 6 panel digipaks, but are the front and the backs of three of their albums.

Album 1 Name- Avenged Sevenfold

 Front
The front of this album features the death-bat, the logo of A7X(Avenged Sevenfold), against a white background with no text whatsoever. That is probably because the album is named after the band, so the logo acts as symbolism making it immediately recognizable. This album cover suggests I may not need anything complex, however that may be because it is an established brand/ band.
Also, it contains the parental advisory label due to the content, which may be a convention of the genre due to the nature of the music.


Back

The back is also white and features the barcode ( maybe stickered on), the songs and the band name, the logo, and still lacks any real detail.
It also contains website links to the band's site and the record labels website. On my product I could include the bands site somewhere if this turns out to be a convention.


Album 2 Name- City of Evil

 Front

This one differs greatly from the first example. The deathbat isn't featured on the front, instead there is the band name and the album title, there is a skeletal with wings (possible the deathbat) figure riding a horse with a city in the background.
The colours are dark and almost hellish looking, possibly reflecting the stereotypical dark nature of the genre.
Also, the parental advisory label makes a return, reinforcing my prior hypothesis regarding its appearance in this particular genre.


The back is similar to the first, however contains a few differences. Firstly, there is more colour than the first album cover, and the font varies from each song.
As with the first, it has a barcode (the white box, it had been removed in this image), the logo and the websites at the bottom of the cover.
This reinforces my previously conceived notion that the links and bar codes may be a convention.


Album 3 Name- Nightmare


 Front
The front cover of this album is very different to the other two, containing the band and album name near one another (the first only had the logo, the second had the album name at the bottom). Also, the reaper-like figure with wings may be fulfilling the need for a deathbat symbol, as is typical of A7X.
Although the colours are less harsh and hellish, there are a lot of dark connotations having what appears to be a young corpse on the cover, in an open grave marked "forever".
There is no parental advisory label on this one, differing to the other two and therefore perhaps proving that not all albums in this genre require warning labels.


Back
The back differs to the other two, not featuring the deathbat, and instead is a shot of scenery, more specifically, a grave yard.
This particular example shows me that my album cover can not only include figures, but also scenic imagery.


6 Panel Digipak- Hand Drawn


 The First Design
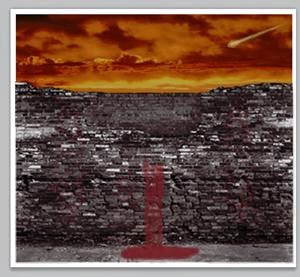
With the first design for the digipak I decided I wanted to show the apocalyptic nature of the world torn apart by the zombie apocalypse. For the front cover, I wanted to include various features of this destroyed world and reference Call of Duty Zombies, and so I revolved my decisions around this idea. I came up with the idea of a wall (annotation cut off), because I see it as a canvas, whatever is on the wall can tell a story. I wanted red/blood on the wall in order to connote the violent and gruesomeness of the Zombies world. I put the album name on the cover as is typical of most album covers , and on the wall I put the logo of the band. I chose to do this, and to write the album name in blood, in order to make everything on the cover a part of the representation of the destroyed world. I also included the meteor in the sky as a reference to call of duty zombies.

The back cover is self explanatory, containing song names and numbers (not on this hand drawn draft however, as they are just place holders). I also chose to mention the fact that this would also be on a wall, creating a link between the front and back covers. I also considered having writing ("help" in blood) on the wall, but this idea may not appear as I think the only things that should appear are the song names, the band name and the album name. In this hand drawn draft, I wasn't sure about where to put the band name however.

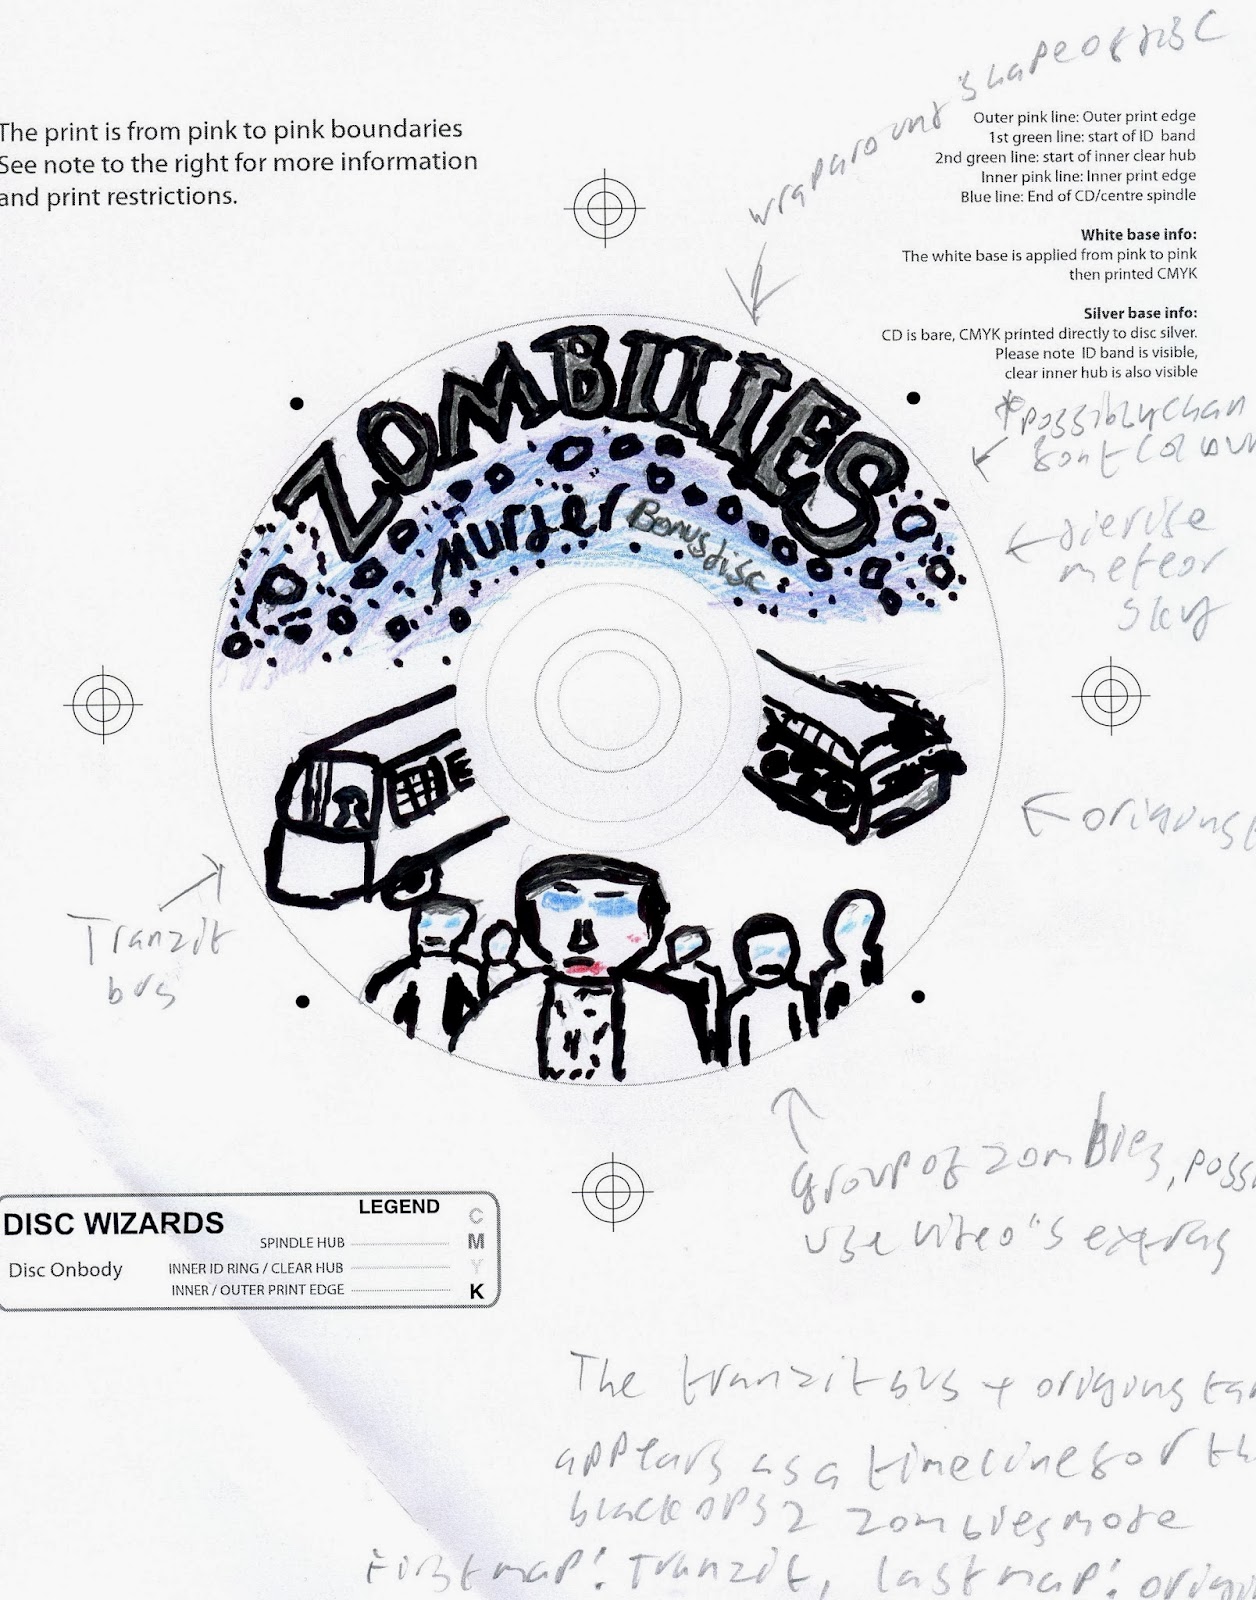
The disc holders, I thought shouldn't have a design that's too complex as the disc would be over the image. I chose to have the Group 916 logo under one, and the album name with zombie eyes near it under the second  as I think they could be simple but effective designs. Also, the zombie eyes determine where disc 2, the bonus DVD, is placed.

The inside covers I decided to take a different approach. On one cover, I wanted to do a collage of different elements of each of the zombies maps. These things would be around a tower, which is a motif throughout the products. I decided they would have to be symbolic of the map, so I chose the bus from Tranzit, the sky from Die Rise, Brutus from Mob of the Dead and somebody flying using the weapon from Buried. I missed out two maps because one is insignificant and the other I had no idea what to put in.
The second inside cover, I wanted to do a shot that could be live action, as if from the music video, with a group of zombies and a survivor. on the survivor's back I put the Group 916 logo as a little easter egg, and also drew links to the game through the asteroid field in the sky, the tower motif and the meteor.
 

The Second Design 

The second design, I approached completely differently, having more of a feeling of the game woven throughout the design.
With this one, I explored the possibility of having half a zombie face as a front cover. I thought that a good layout for this concept would be the album name atop the cover, and the band name crossing either side of the nose.
Also, the back cover I decided In would have the group 916 logo on this one, though as for what kind of background I would use I was unsure. Some ideas include a wall, blueprint paper or possible even a loading- screen style cover, made to look like a Zombies map loading screen.
On the disc holders, I went with a design based off of the perks in Call of Duty Zombies as they are shown on the machines in game. I came up with this idea because I knew the disc would then cover the design perfectly, meaning they would be only seen while the discs were out of the digipak. Building on this idea, I could have a similar design on the discs.
The two inside covers were straight forward ideas. I needed a place to have the song list so I decided one of the inside panels should have that on. I thought I would have a black background, but I also came up with other ideas i didn't initially consider like faded out zombies menus or loading screens.
The other cover, I came up with something completely different. Firstly, with this I wanted to explore the concept of having a map like the menu to Black Ops 2 Zombies, only I wanted the full globe (as on the menu it spins to what map you select). After drawing how it would appear, with each map logo on,  I had some spare room on the panel, and so decided to fill the space with the asteroid sky and Richtofen (one of the key characters in zombies). His hat is of the Luftwaffe variety, and his eyes glow blue in my design to reflect the fact that he controls the zombies.


In creating the digipak, I may borrow ideas from both of these designs rather than stick to one.The ideas I like most are the front and back covers of the first design, the disc holders of the second design, and I like one of the second covers on the second design, and the inside covers on the first design.

Thursday 19 December 2013

Making my Video- Costs and Caps

An issue arose during recording my footage from Call of Duty. There is a cap/limit to how many films you can have saved for uploading to the internet- 8 films. This limited how many edited clips I could have. What's worse is that all footage must be under 2 minutes long, meaning I couldn't merge some of the footage I had done into less videos. This presented me with two options to solve this issue:

1. I could upload clips of less than two minutes for editing, and then delete them afterwards. The issue with this being I would be losing the original footage permanently, meaning if there was an error with YouTube after I deleted my footage, it would become problematic getting that footage or anything similar again; costing time.
2. There is an option to purchase an upgraded file limit from the Call of Duty store, costing £1.45, allowing for storage of 40 clips over the previous 8 clips. This would mean I could store everything from the test shots and the actual footage I will be using.

In the end, I decided to fork out for the upgraded capacity so I could store everything. It will give me more freedom when getting said footage from the game, allowing me to experiment more and save it.


*Other Costs*
Other costs that arose during pre-production included the cost of the face paint and blood. This amounted to about £7